Fluffy Egg and Cheese Breakfast Sandwich

I enjoy a good fried egg sandwich, or an English muffin sandwich, or something similar for an occasional breakfast. For the past week or so, I had an idea in my head of something I wanted to do to change it up a bit, and I finally went through with it today.

I started by putting a metal bowl in the refrigerator. I wanted it to be a little cold for whipping up some egg whites. I separated the yolks and whites from two eggs. I then added approximately 1 1/2 tablespoons of milk into the egg yolks and mixed that together. I then whisked the egg whites until they were nice and airy, but not forming peaks. Once these were both done, I put the heat to medium high to get my pan warmed up.

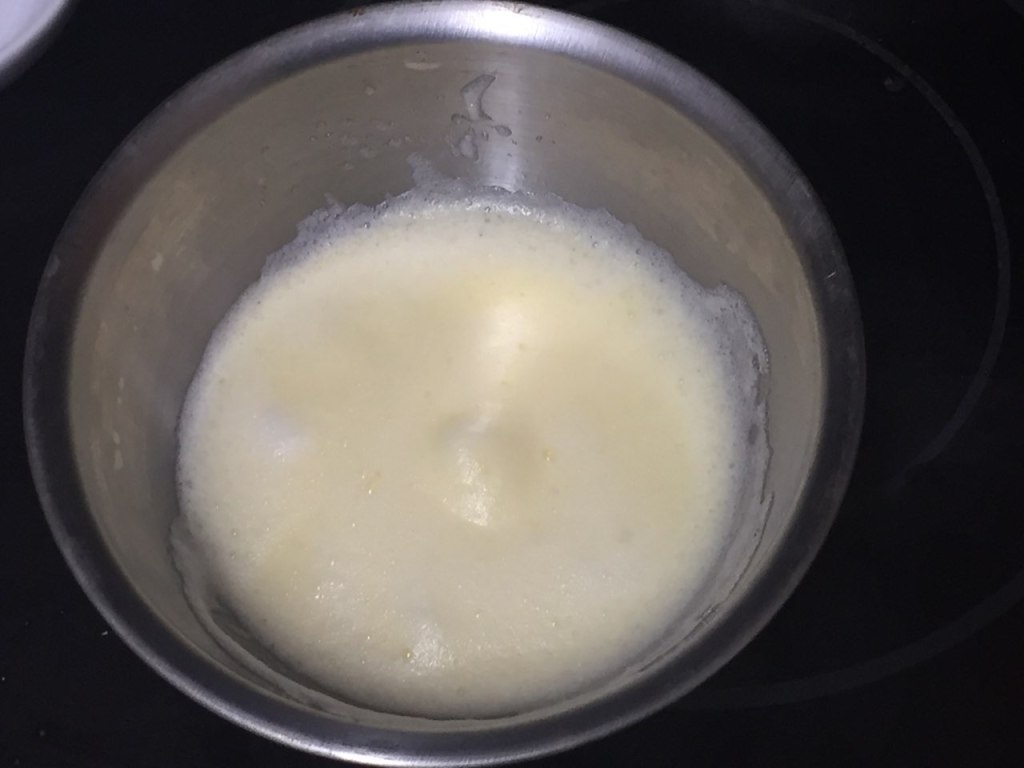
I gently folded the egg yolks and the egg whites together. Once those were combined, I added in both sides of an English muffin that had been split. I made sure to get all sides thoroughly covered with the mixture.

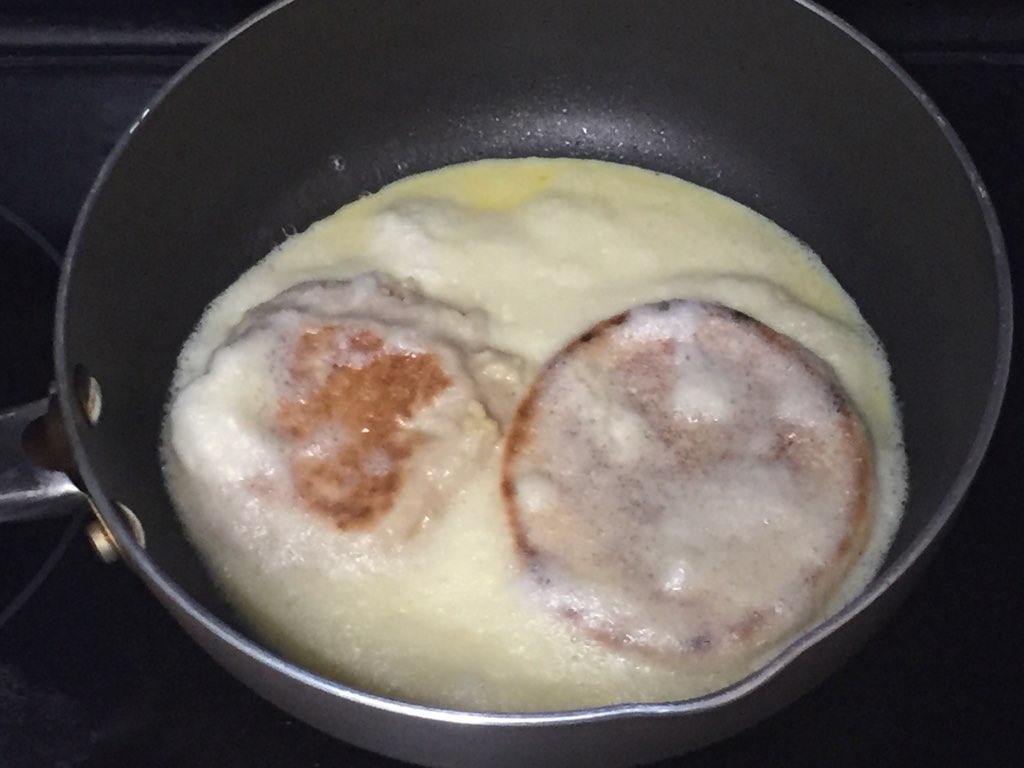
The pan was hot enough at this point, so I poured in the egg mix and then gently placed the English muffin in the pan, interior side down. I covered the pan and let this cook for about 2 minutes.

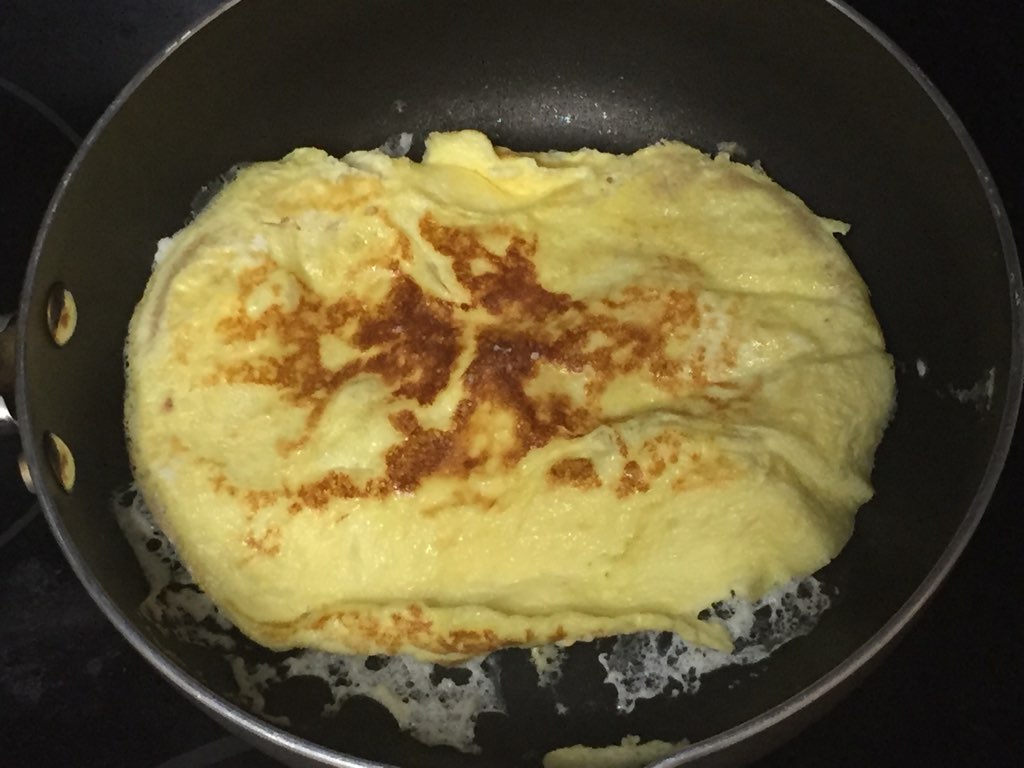
I flipped it over and thought it looked even better than I was expecting. I covered this again and let it cook for another 2 minutes.

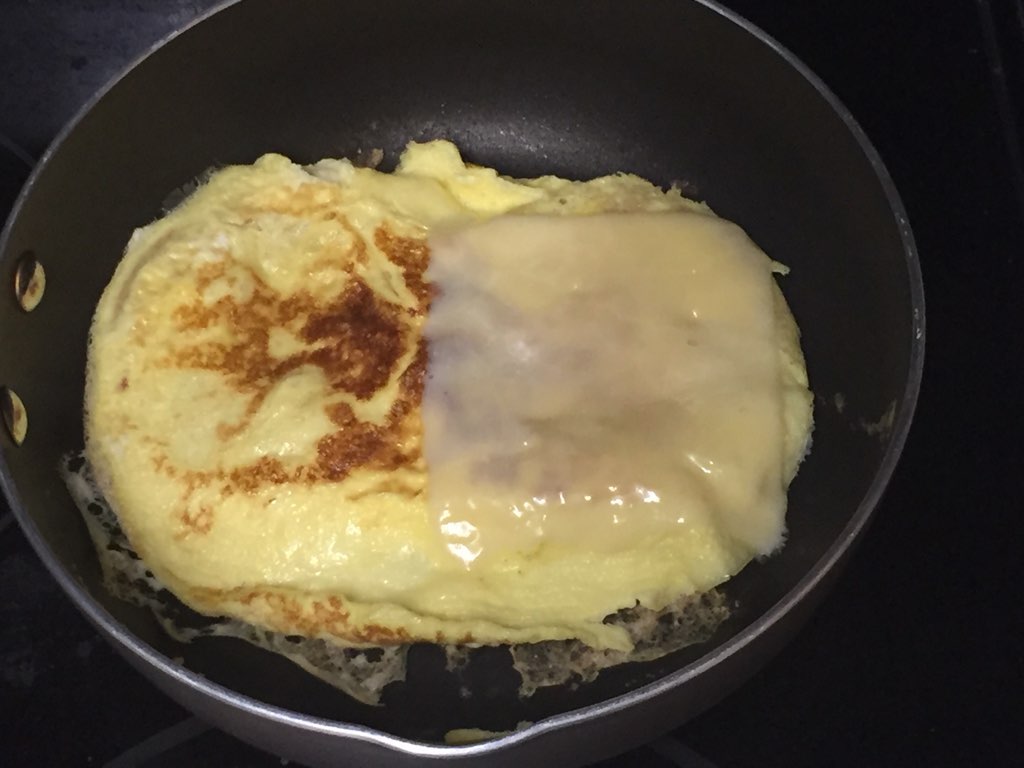
I turned off the heat, added a slice of cheddar cheese and covered it for another minute to get the cheese nice and melted.

I closed it up and it was all ready to be devoured.

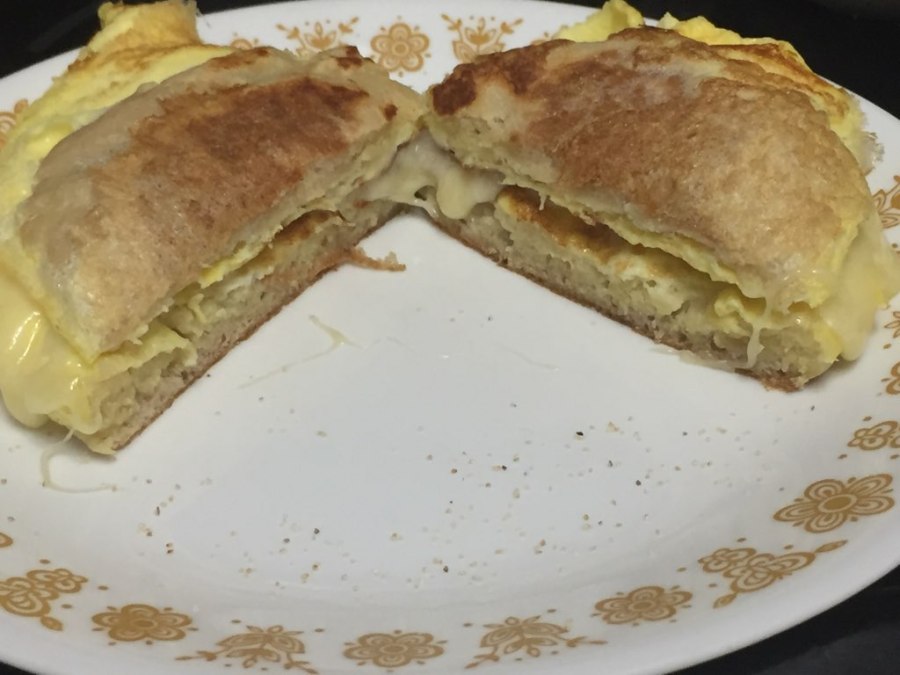
I decided to slice it in half just so you could see how it looked on the inside. I thought this was a delicious breakfast sandwich. It might have been better with some bacon or sausage in the middle, but it was still very tasty. Although the English muffin had been smothered in the egg mixture, it was not mushy or soggy on the outside. The eggs were light and fluffy, and provided a nice texture when biting into the sandwich. There is no doubt in my mind that I will be making this again. This was a very positive start to what will be a very hot weekend.

Advertisement

Flavorful Cheese Spread

Yesterday, I decided to get a little creative and make myself a cheese spread. I was checking out quite a few recipes, and the main ingredients that I saw over and over again were mayonnaise and cream cheese. Good options, to be sure, but I wanted to do things slightly different, and I did.

I started by finely chopping one vidalia onion, about 1/3 of a red bell pepper, 1/3 of a green bell pepper, and four cloves of garlic.

Next, I added in 1/2 teaspoon of garlic powder, 1/2 teaspoon of onion powder, and 1/2 teaspoon of black pepper. I mixed those dry ingredients in, and then added the wet ingredients. 1 teaspoon of Worcestershire sauce, 1 teaspoon of hot sauce, 1/2 cup of sour cream (I used reduced fat), and 1 cup of plain yogurt (I used non-fat). If I left it at that, it would have made for a good dip, but I wanted a little something more.

I added in 8 ounces of shredded cheese. I used a block of extra sharp cheddar. After that all got mixed in together, I put it in the refrigerator for a couple of hours.

At first, I had it as a dip with some pita chips. The flavors were nice, and there was a bit of a bite to it, which wasn’t overbearing. This was a tasty treat, and it worked pretty well.

Later on, I decided to amp things up and make a grilled cheese sandwich with the spread. Nothing else added to it, other than some butter on the outside of the bread to give it that nice crisp texture and buttery flavor. This worked well as a hot sandwich, but the bread cooked too quickly. I’ll have to work on ways to get the inside a bit hotter and the cheese slightly melty. The filling was hot, but I was hoping for a bit more. Maybe next time I will just leave the mixture out for a little to get to room temperature, instead of taking it directly from the refrigerator.

Overall, I was happy with the mixture. I think I would scale back on the peppers a bit in the future, or increase the amount of cheese in there. There is a good balance of flavor right now, but I would prefer that the cheese play a more prominent role. No matter what, this was a great way to get the weekend off to a positive start.

Homemade Baked Beans – May 25, 2020

In addition to the potato salad, I also decided to make a batch of homemade baked beans. This was another two day process, but I think it was worth it.

I started with one pound of dry northern beans. I let those soak for about 8 hours, until they nearly doubled in size. I drained the water and then put them in a spaghetti pot (with strainer). I cooked them on medium high until they came to a boil, and then continued to let them boil for about one hour, stirring occasionally. I turned the heat down to a medium to medium-low, and let them continue to cook for another hour, until the beans were tender. I kept testing the beans, since I didn’t want them to get to a completely mushy stage. When the beans were done and cooled, I put them in a container and refrigerated them overnight. I saved and refrigerated the leftover water as well.

I cooked up 6 pieces of bacon at 350 for 12 minutes, and then let them cool. They were not completely cooked, but they were a little more than halfway done. Not crispy or crunchy at all. I let them completely cool and refrigerated those as well.

This morning, it was time to bake the beans. I preheated the oven to 325 degrees. I put the beans and 1 cup of the leftover water in a big bowl. I chopped up one onion, one shallot, and 3 cloves of garlic, and then added those to the bowl. I cut up the bacon into bite-sized pieces and added them. I mixed in 3 tablespoons of molasses, 3 tablespoons of mustard, 1 tablespoon of Worcestershire sauce, 1/4 cup of ketchup, 1/2 teaspoon of liquid smoke, 1 tablespoon of apple cider vinegar, 1/4 cup of brown sugar and 1/4 teaspoon of black pepper. I added some more of the water, to make sure the beans didn’t dry out too quickly.

I cooked the beans for about 4 hours total. I stirred it after the first hour, and then every 20-30 minutes thereafter. I didn’t want to have any clumps stuck to the bottom of the dish, so frequent stirring was key. I really liked the color that these had.

I really enjoyed the flavor of these baked beans. The texture of the beans was just right. Nice and soft, but not so soft that it turns to much when you put a fork in it. The bacon was really soft, but still had a nice, smoky flavor. The vinegar, liquid smoke, and molasses brought in an extra couple of layers of flavor that reminded me of childhood days. It may be a lot easier to open up a can of beans and heat them on the stove, but when you put in some good time and effort and the results are this good, it makes it an even more satisfying meal. Definitely a great way to continue to remain positive for the day.

Homemade Potato Salad – May 25, 2020

Since this is Memorial Day Weekend, I thought about the traditional meals – hamburgers and hot dogs, potato salad, baked beans, and so on. I decided on making some potato salad. I made this on Sunday because I wanted to give time for the flavors to come together.

The first thing I did was cook up some bacon. I wanted it extra crispy, so I cooked it for 20 minutes in a 350 degree oven, flipped them over, and cooked them for another 10 minutes. Once they were cooled, they were easy to break apart.

The next step was boiling the potatoes. I decided to go for a potato medley, since I thought that would give some nice colors. I chopped them up into bite-sized pieces and boiled them until they were tender, about 20 minutes. It’s important to keep testing the texture, since they can go from not cooked enough to mush if you aren’t paying attention. My goal was to have these firm enough to bite through the exterior, but with an interior that was smooth and creamy.

I usually enjoy adding some celery to my potato salad, but I saw these carrots and thought they would fit in well with the potato medley.

I put a little bit of the bacon grease on the bottom of a pan, chopped up the carrots, and let them cook for a few minutes. Although raw carrots are fine, I wanted to add a little flavor and soften them up just a bit. I do the same thing when I am adding celery, so this was business as usual for me. After a few minutes, I added in about 1/4 cup of water and let that continue to cook for a couple of more minutes. The goal was to have the carrots slightly cooked and have them absorb some of the bacon flavor, but not be completely cooked and soft.

After all the veggies are done cooking, they have to get completely cool. I let them sit in the refrigerator for a couple of hours, then let them get to room temperature. I added in the chopped bacon and three hard boiled eggs.

Next, I added the dry ingredients and mixed them all in. 1/2 teaspoon of garlic powder, 1/2 teaspoon of onion powder, 1/2 teaspoon of celery seed, 1/4 teaspoon of black pepper and 1/8 teaspoon of celery salt.

It was now time to add the wet ingredients. I added 1 tablespoon of honey mustard and approximately 1/4 cup of mayo. I didn’t want to completely overdo it with the mayo, but wanted to make sure everything held together well. I took a couple of bites and it tasted really good.

After letting it sit overnight, I finally had some more today. The flavors really did come together well. Some people might add in pickle relish, or maybe just pickle juice. I think the combination of the wet and dry ingredients pleased my palate enough that it didn’t need much else. I really enjoyed the small bites of carrots. This was a fun and colorful potato salad, and definitely kept me in a positive frame of mind on this Memorial Day.

Homemade Chocolate Chip Banana Bread – 05/25/20

When I bought some bananas last weekend, I bought them with the intention of making some banana bread this weekend. There was a book I received from one of my sisters for my birthday, and I thought I could use the modified recipe. The book is from Michael Ruhlman and is titled “Ratio”. The subtitle is “The Simple Codes behind the Craft of Everyday Cooking”. This goes into the ratios and breakdowns for recipes, which should make it easier to adapt for larger or smaller audiences.

The Basic Quick Bread/Muffin Batter ingredient breakdown is:

8 ounces flour

4 ounces sugar

1 teaspoon salt

2 teaspoons baking powder

8 ounces milk

4 ounces eggs (2 large eggs)

4 ounces butter (1 stick), melted

If you add 1 cup of mashed banana, you should take away 2 ounces of the wet ingredients.

I started by setting the oven to 350 degrees. The next step should have been to brown the butter (the book recommends brown butter for banana bread). Since the butter is going to be hot, it will take more time to cool down before mixing with the eggs. You want banana bread, not banana and scrambled eggs bread.

Per the instructions, I combined the dry ingredients and the wet ingredients separately. I had to wait a bit while the butter cooled, since I started on that after combining the dry ingredients. I had one large banana, and I mixed that in with the wet ingredients. Since it was a week old, it was a little mushy, but not overly mushy. I only used 6 ounces of milk in this recipe, and it worked just fine. Once the wet and dry ingredients were mixed together, I added in 3/4 cup of chocolate chips.

I poured the batter into an 8″ loaf pan that I had coated with cooking spray. I made sure it was relatively even, and then baked it for about 50 minutes (I did it for 40 minutes at first, then kept an eye on it). Once a knife inserted in the center comes out clean, it’s good. Mine had melted chocolate chips, but no batter dough, so I knew it was done.

Those last 10 minutes were key. The top hadn’t browned after 40 minutes, but it was perfect with another 10 minutes. And when it was out of the pan, the sides had color as well.

Having a banana bread look good is one thing, but it also tasted really good. The bread had perfect consistency. The nice, light bite on the outside and the soft, moist bite on the inside. The melted chocolate chips were great as well. I think that if I make this again, I’ll use two medium bananas instead of one large banana. It had a mild banana flavor to it, but I think it would have been better with even more banana flavor. I also had been thinking about adding cinnamon, but I don’t think it needed it at all.

This was a great start to the day and an easy way to get things going in a positive way.

Homemade Shells and Cheese

I’m going to start tonight’s post with a disclaimer. This site has ads on it. There have been some recent ads that imply you can print this recipe. Those are just ads and not part of my site. I don’t want to mislead anyone who might click on something accidentally. Thank you.

Now, onto the food. I was planning on making some pasta and cheese sauce for a few weeks, but I got busy making and eating other foods, and didn’t buy the ingredients I needed until this past weekend.

I started by heating up some water over medium-high heat. I added a little butter and garlic powder to it, but that is optional. Once it was boiling, I added a box of pasta – my choice for today was shells. As soon as I put the pasta in the water, I knew I had between 8-10 minutes to make the cheese sauce.

I started by making a roux. With the burner on medium, I melted 1/4 cup of butter and then added 1/4 cup of flour (should be equal parts). As soon as the flower was incorporated and the bubbles started going, I was ready for the next step.

I added in 1 cup of heavy cream and 1 cup of milk. I constantly stirred this until the roux and the liquids were completely incorporated. It’s also important to frequently stir the pasta, to prevent any possible clumping.

I then added in 2 cups of shredded cheese. I used some extra sharp cheddar today, but there are days when I go with a milder cheese and there are days when I go with something with a little more tang. I turned the temperature to low and stirred in the cheese. It was right at this point that the pasta was done, so the timing couldn’t have been better.

I drained the pasta and then added it to the cheese sauce. I turned off the heat and mixed it in and it was ready to be served.

This was a lot of creamy, cheesy goodness. I only added a little pepper to it, but could easily have added more. This had a nice, smooth flavor. It was a bit mild, but still really good. This was a great way to get the week started with a positive frame of mind.

Warm German Potato Salad

I am a fan of Potato salads and macaroni salads. I like trying different styles as well, since each adds their own unique style and flavors. A potato salad that I tend to enjoy every now and again is a German potato salad. I had some potatoes, and I thought I should put them to use.

I started by boiling four russet potatoes. I boiled them until they were ready and they easily slid off of a fork when checking for doneness. I set them aside and saved the water (to be used later).

I sliced up one half onion and one shallot into thin strips. I cut them up this way because this is how I am used to enjoying them in a German potato salad. I used the same pot that I boiled the potatoes in, and heated up 1 tablespoon of vegetable oil (your choice of oil should be fine). I added the onions and shallots and let them cook for a few minutes, stirring frequently.

While the onions were cooking and the potatoes were slightly cooler, I sliced the potatoes and set them aside. I also put together a mixture of dry ingredients in a small bowl. These were: 1 1/2 teaspoons flour, 1 teaspoon sugar, 1/2 teaspoon celery salt, 1/8 teaspoon black pepper, and 1/4 teaspoon garlic powder.

I cooked the onions until they started to slightly brown.

Next, I added in the dry seasonings and stirred those all around to get the onions coated.

Next, I added in 1/2 cup of the leftover water (you can use fresh if you would prefer) and 2 tablespoons of white vinegar. I stirred it all together and continued to cook until it came to a slow boil. I then removed it from the heat, added in the sliced potatoes, and incorporated everything together.

The end result was a delicious, warm potato salad. The potatoes were cooked perfectly – they were not too hard to bite through and not so soft that they dissolved before you could pick them up. The onions had really nice flavor. They absorbed the seasonings and the juices well. The flavors and the textures of this dish surpassed my expectations. I know that my leftovers will be cold, but they will have had time to absorb the flavors, and I am looking forward to them.

This was a great way to start the weekend and I was happy to eat them (even the second and third helpings).

Crispy Carnitas Tacos

This past weekend, I made some slow cooked pork as well as some salsa verde. I did this with the intention of using them today. Today happens to be Cinco de Mayo, but it is also Tuesday, so I am counting that as a Taco Tuesday as well.

I started by taking some of those slow cooked chunks of pork and placing them on a pan that’s covered with aluminum foil. It’s important to note that this pan has four sides. The meat is juicy and I did not want to have to deal with any more mess than was necessary. I put this under a broiler for about five minutes. I made sure that it was not too close to the broiler, since I did not want any of the grease to catch fire.

Next, I spooned some of the saved drippings over the top of the meat. Since this is adding even more grease, it’s really important to keep a close eye on things. This was back under the broiler for another 3 minutes.

Once the meat was done, it was time to start assembling the tacos. I used some flour street tacos, and heated them a little bit first. A small portion of meat, some cilantro and chopped onion. I could have stopped there, but I didn’t.

I sprinkled on a little cheese, drizzled some of the salsa verde over it and topped it off with a lime wedge. I wanted the visual appeal and familiar feel, which is why I placed this on aluminum foil.

The carnitas were really good. I wanted to have the nice crispy exterior with the tender and juicy interior, and I succeeded. The salsa verde complemented the pork nicely, and the squeeze of lime juice was the perfect topper. I can’t say that this is better than what I used to be able to get in some hole in the wall restaurants when I lived in Southern California, but it was still really good.

This was a great way to shift into the middle of the week. With food that tasted this good, it was easy to stay positive!

Smooth Salsa Verde

Since I was trying to prepare some foods for this coming Tuesday, I also decided on making some salsa verde. This will be going well with what I plan on doing with my slow cooked pork, so I’m happy that I got the first pieces of the plan in place.

I started by setting the oven to 450. I used 10-12 tomatillos. I removed the skins and then rinsed them down (they were a bit sticky and I wanted to make sure there was no residue on them). I cut them in half and placed them in a roasting pan. I then cut two medium onions into chunks and cut two jalapeño peppers in half (removed the stem and the seeds). I cut the top off of one bulb of garlic. I drizzled with olive oil, salt and pepper and then put it in the oven for about 20 minutes.

Once it was ready, it smelled incredible. The juice of the tomatillos got out, but that was okay. The garlic was soft and melty and it was tempting to just it the cloves right then and there.

I was able to resist the temptation and put everything in a blender (minus the garlic skin. I decided to let it go until completely blended, but if you want some chunks, just pulse it for a few seconds.

I added the juice of one lime and 1 tablespoon of chopped cilantro, and it was good to go. The jalapeños give it a nice bite, but it still has a coolness to it that doesn’t burn the throat. I snacked on this a little bit, but wanted to save the rest for Tuesday. A great way to finish the weekend!

Slow Cooked Pork

I am getting myself ready for this coming Tuesday. It’s a two for one – Taco Tuesday and Cinco de Mayo. I wanted to do some slow cooked pork in preparation for carnitas on Tuesday, and today was the perfect day to get it done.

I bought a huge bone-in pork butt (the smallest of the ones they had left, but it was more than 9 pounds). Instead of just putting it in the slow cooker as is and then shredding it once done, I cut it into chunks. I tried to get as many meaty chunks set aside for the slow cooker. I set aside the bone and the fattier pieces.

I started by putting 1/2 cup of apple juice in the bottom, then I put in the chunks of meat. I added one tablespoon of paprika, one tablespoon of chili powder, 1 teaspoon of cumin, and 1 teaspoon of black pepper. I poured another 1/2 cup of apple juice over the top and then mixed it all together. I let that cook on low for about 7 hours.

While that was cooking, I heated the oven to 450. I put the bone and trimmed fatty pieces in a roasting pan with a drizzle of olive oil, some cracked salt and pepper, and let it cook for about 30 minutes. Once that was done, I set aside the meat and I also saved the drippings (I plan on using the drippings on Tuesday). I then made a broth with the bone and fat, and set it aside for another day.

Once the meat was done, I took it out and let it cool. The pork had really nice flavor, and the chunks were tender and juicy. I saved some of the juice, since I don’t want it to dry out for Tuesday. This was an effective way to spend the day inside, and it was easy to be in a positive frame of mind with the wonderful aromas in the house.